现在不管什么专业,貌似多多少少都得和深度学习扯上点关系才好写文章(水文章).其中最常用的深度学习框架应该是tensorflow,pytorch这些python的三方库,既然最近在学Rust那就来借机讲讲torch的Rust绑定—tch-rs
其实tch实际上是基于libtorch的封装,而不是pytorch.因此使用起来如果熟悉libtorch的api的话会更容易,不熟悉也没关系毕竟pytorch的api也差不多;况且我相信愿意弄这个的人应该都是对技术感兴趣的,而不是那些为了造学术垃圾抄点代码改改参数点个run.
废话不多说,今天的主题就是配置好环境然后写一个推理demo
环境配置
1. libtorch安装(Ubuntu)
上面说了tch是基于libtorch的封装,因此底层还是需要使用libtorch的相关api,而且最新版本的要求安装libtorch版本为2.0.0.Torch官网目前给出的libtorch版本是2.1,如果安装之后运行会显示
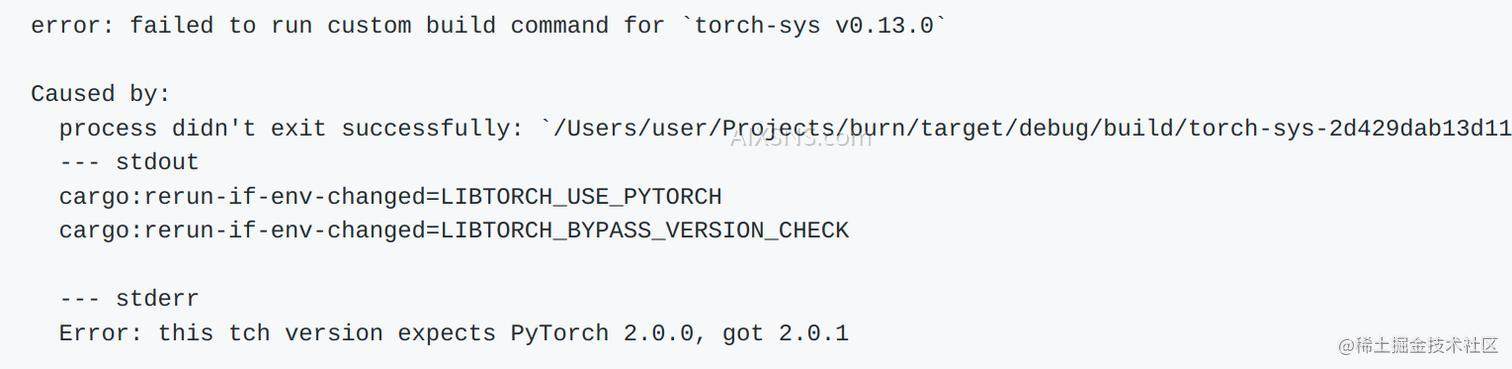
具体可以看这个issue,同时也给出了解决办法设置一个LIBTORCH_BYPASS_VERSION_CHECK的环境变量来避免版本检查,但是作者也不确定不同版本的api是否会有差异,因此还是建议下载libtorch 2.0版本
根据tch官网的介绍,我们将libtorch下载解压之后在环境变量中配置相应的路径
export PATH="xxx/libtorch:$PATH"
export LIBTORCH=xxx/libtorch
export LD_LIBRARY_PATH=$LD_LIBRARY_PATH:"xxx/libtorch/lib:$LD_LIBRARY_PATH"
export LIBTORCH_INCLUDE=xxx/libtorch
export LIBTORCH_LIB=xxx/libtorch
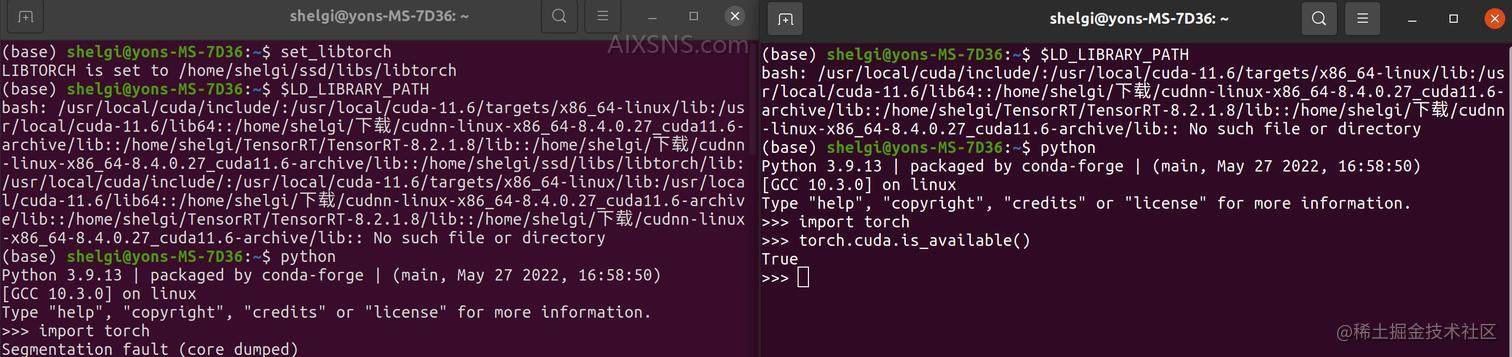
这样的话,就可以进行tch的引用.不过这里有个小插曲,由于我之前偷懒把平时需要的python库都装在Base中,而不是虚拟环境.这就造成直接设置为环境变量,在使用python导入torch的时候出现段错误

为了找到错误原因,直接gdb python调试
r -c "import torch"&&bt
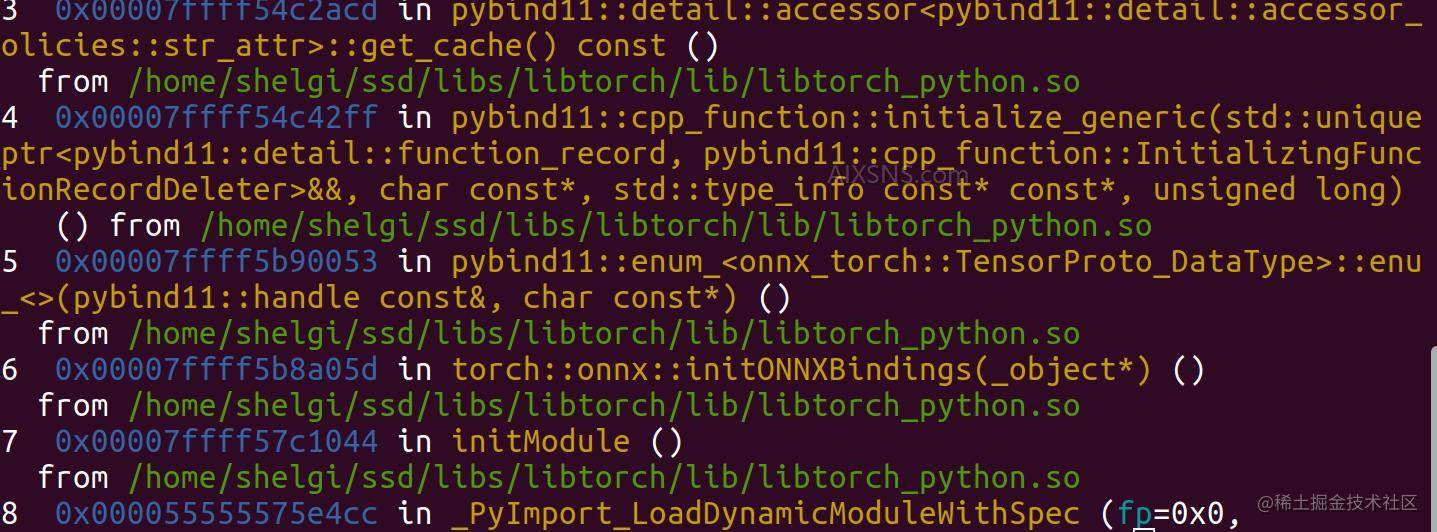
引用的是我写在环境变量中的lib,既然是这样我们就不能随便将libtorch直接写入,而是在bashrc中写个函数封装一下
function set_libtorch(){
export PATH="xxx/libtorch:$PATH"
export LIBTORCH=xxx/libtorch
export LD_LIBRARY_PATH=$LD_LIBRARY_PATH:"xxx/libtorch/lib:$LD_LIBRARY_PATH"
export LIBTORCH_INCLUDE=xxx/libtorch
export LIBTORCH_LIB=xxx/libtorch
echo "LIBTORCH is set to $LIBTORCH"
}
这样,我们需要使用tch时运行一下这个函数就可以顺利编译,平时也能愉快的用python
2. tch使用
我们首先在.toml中添加依赖
[dependencies]
tch="0.13.0"
然后写一个demo mod
use tch::Tensor;
pub fn demo() {
let mut t = Tensor::from_slice(&[3, 1, 4, 1, 5]);
t.print();
t = t * 2;
t.print()
}
pub fn cuda_is_available(){
println!("Cuda available: {}", tch::Cuda::is_available());
println!("Cudnn available: {}", tch::Cuda::cudnn_is_available());
let device = tch::Device::cuda_if_available();
println!("Device :{:?}",device);
let t = Tensor::from_slice(&[1,2,3,4,5]).to(device);
t.print();
}
在main中调用函数
mod demo1;
fn main() {
demo1::demo();
demo1::cuda_is_available();
}

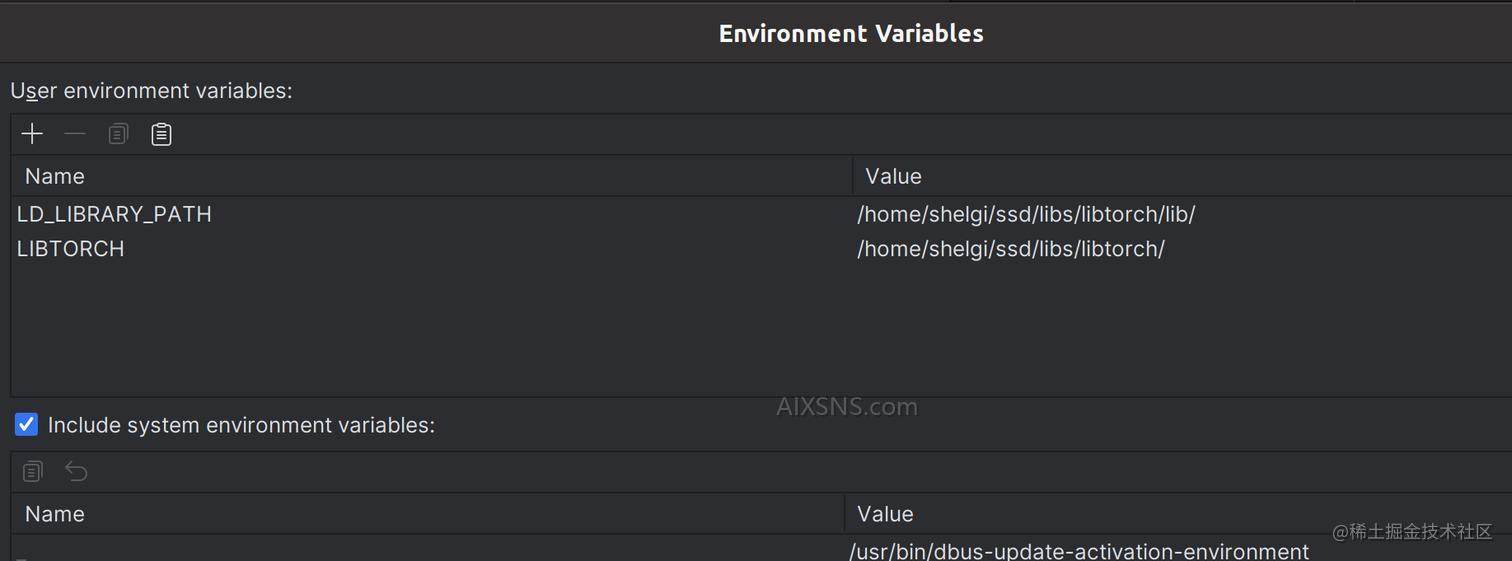
上面这是在terminal中用命令cargo run main运行,如果更喜欢点一下run运行需要在运行设置中添加环境变量
3. Yolov8推理实战
既然是实战,那就必须得来点硬货.今天,我们就用tch实现一下Yolov8的推理.
大致思路:
- 从Yolov8中导出torchscript权重文件.
- 构建YOLO结构体,封装前处理,预测,后处理等方法.
- 对输出进行绘制并保存
3.1 torchscript导出
这里直接clone源码,然后导出的方法已经封装很好了
from ultralytics import YOLO
model = YOLO("yolov8s.pt")
success = model.export(format="torchscript",imgsz=(640,640))
注意,这里导出不要使用optimize,否则torchscript加载模型会出错.
3.2 YOLO结构体设计
这部分集中了三个部分,模型加载导入与图像加载的前处理,模型推理,模型的后处理(NMS).
3.2.1 模型加载与前处理
模型加载与图像加载我们写在主函数中
let args: Vec<_> = std::env::args().collect();
    let (weights, img_path) = match args.as_slice() {
        [_, w, i] => (std::path::Path::new(w), i.to_owned()),
        _ => bail!("usage: main yolov8.torchscipt image.jpg"),
    };
    let device = tch::Device::cuda_if_available();
    println!("Run inference by device={:?}", device);
    let mut yolov8 = yolo::YOLO::new(weights, 640, 640, 0.25, 0.65, 100, device);
    let img = yolo::YOLO::preprocess(&mut yolov8, &img_path).to_device(yolov8.device);
其中,YOLO类的初始化以及前处理代码如下
pub struct YOLO{
model:tch::CModule,
pub device:tch::Device,
h:i64,
w:i64,
conf_threshold:f64,
iou_threshold:f64,
top_k:i64,
}
impl YOLO{
pub fn new(weights: &Path, h: i64, w: i64, conf_threshold:f64, iou_threshold:f64, top_k:i64, device: tch::Device) -> YOLO {
let mut model = tch::CModule::load_on_device(weights, device).unwrap();
model.set_eval();
YOLO {
model,
h,
w,
device,
conf_threshold,
iou_threshold,
top_k,
}
}
pub fn preprocess(&mut self, image_path: &String) ->tch::Tensor{
let origin_image=tch::vision::image::load(image_path).unwrap();
let (_,ori_h,ori_w)=origin_image.size3().unwrap();
self.w=ori_w;self.h=ori_h;
let img = tch::vision::image::resize(&origin_image, 640,640).unwrap().unsqueeze(0).to_kind(tch::Kind::Float)/255.;
return img;
}
}
这里YOLO结构体中保留模型信息,图像大小,推理设备以及NMS的阈值,然后前处理部分只需要将图片resize到(640,640)写死.需要注意的是,我们可以去看python中predict的源码,模型推理的时候对输入的前处理仅仅是resize和规一化,并没有使用normalize.因此,这里前处理的时候千万不要加normalize,也不要使用tch::vision::imagenet::load_image_and_resize()函数,因为这个函数默认会进行normalize

后果就是模型推理的输出无法对齐,导致后续处理结果全部出错.
3.2.2 模型推理
模型推理很简单,只需要调用forward_t()就可以进行正向传播推理.这里为了统计推理耗时,额外加了一些代码
pub fn predict(&self, image: &Tensor) -> Vec<Bbox> {
let start_time=Instant::now();
let pred = self
.model
.forward_t(image,false);
let end_time=Instant::now();
let elapsed_time=end_time.duration_since(start_time);
println!("YOLOv8 inference time:{} ms",elapsed_time.as_millis());
let pred=pred.to_device(tch::Device::Cpu);
let start_time=Instant::now();
let result = self.non_max_suppression(&pred);
let end_time=Instant::now();
let elapsed_time=end_time.duration_since(start_time);
println!("YOLOv8 nms time:{} ms",elapsed_time.as_millis());
result
}
关于为什么要计时,这里有个很有趣的问题留到最后再分析.
3.2.3 NMS后处理
为了删除冗余的预测框,提高检测精度,通常都会进行NMS操作.原理就是把置信度低的预测框与邻近冗余的预测框全部删除,只保留筛选后的预测框.这里筛选的条件就是self.conf_threshold与self.iou_threshold.
这里稍微说明一下,Yolov8与之前的Yolov5等模型的输出不同之处在于,它的输出格式为(Batch_size,84,80*80+40*40+20*20=8400),也就是说输出只有回归框+80个类别对应的置信度,而且回归框总数放到了最后一个维度.通常为了遍历的时候内存对齐,还是交换这里的输出维度比较好.
第一步进行置信度筛选
let pred= & pred.transpose(2, 1).squeeze();
let (npreds,pred_size) = pred.size2().unwrap();
let nclasses=pred_size-4;
let mut bboxes: Vec<Vec<Bbox>> = (0..nclasses).map(|_| vec![]).collect();
let class_index=pred.i((..,4..pred_size));
let (pred_conf,class_label)=class_index.max_dim(-1, false);
// pred_conf.save("pred_conf.pt").expect("pred_conf save err");
// class_label.save("class_label.pt").expect("class_labe; save err");
for index in 0..npreds {
let pred = Vec::<f64>::try_from(pred.get(index)).unwrap();
let conf = pred_conf.double_value(&[index]);
if conf>self.conf_threshold{
let label=class_label.int64_value(&[index]);
if pred[(4 + label) as usize] > 0. {
let bbox = Bbox {
xmin: pred[0] - pred[2] / 2.,
ymin: pred[1] - pred[3] / 2.,
xmax: pred[0] + pred[2] / 2.,
ymax: pred[1] + pred[3] / 2.,
confidence: conf,
cls: label,
};
bboxes[label as usize].push(bbox);
}
}
}
首先通过下标索引得到类别对应的列,然后取最大值作为置信度与类别标签.将置信度大于阈值的检测框进行保存.这里注释掉的两行就是因为一开始输出结果一直不对,为了看输出是否对齐然后进行保存的.然后再进行iou筛选
for Bboxes_for_class in bboxes.iter_mut() {
Bboxes_for_class.sort_by(|b1, b2| b2.confidence.partial_cmp(&b1.confidence).unwrap());
let mut current_index = 0;
for index in 0..Bboxes_for_class.len() {
let mut drop = false;
for prev_index in 0..current_index {
let iou = self.iou(&Bboxes_for_class[prev_index], &Bboxes_for_class[index]);
if iou > self.iou_threshold {
drop = true;
break;
}
}
if !drop {
Bboxes_for_class.swap(current_index, index);
current_index += 1;
}
}
Bboxes_for_class.truncate(current_index);
}
fn iou(&self, b1: &Bbox, b2: &Bbox) -> f64 {
        let b1_area = (b1.xmax - b1.xmin + 1.) * (b1.ymax - b1.ymin + 1.);
        let b2_area = (b2.xmax - b2.xmin + 1.) * (b2.ymax - b2.ymin + 1.);
        let i_xmin = b1.xmin.max(b2.xmin);
        let i_xmax = b1.xmax.min(b2.xmax);
        let i_ymin = b1.ymin.max(b2.ymin);
        let i_ymax = b1.ymax.min(b2.ymax);
        let i_area = (i_xmax - i_xmin + 1.).max(0.) * (i_ymax - i_ymin + 1.).max(0.);
        i_area / (b1_area + b2_area - i_area)
}
当然,有可能最后输出的结果还是很多,所以最终用top_k参数作为最终输出个数限制,输出的目标数不应该超过top_k的值.
let mut result = vec![];
let mut count=0;
for Bboxes_for_class in bboxes.iter() {
for Bbox in Bboxes_for_class.iter() {
if count>=self.top_k {
break;
}
result.push(*Bbox);
count+=1;
}
}
return result;
3.3 保存结果
首先查看tch官网yolo的demo,把绘制矩形框部分的代码借用
fn draw_line(&self, t: &mut tch::Tensor, x1: i64, x2: i64, y1: i64, y2: i64) {
let color = tch::Tensor::from_slice(&[255,0,0]).view([3, 1, 1]);
t.narrow(2, x1, x2 - x1)
.narrow(1, y1, y2 - y1)
.copy_(&color)
}
pub fn show(&self, image: &mut Tensor, bboxes: &Vec<Bbox>) {
let w_ratio = self.w as f64 / 640 as f64;
let h_ratio = self.h as f64 / 640 as f64;
for bbox in bboxes.iter() {
let xmin= ((bbox.xmin * w_ratio) as i64).clamp(0, self.w);
let ymin = ((bbox.ymin * h_ratio) as i64).clamp(0, self.h);
let xmax = ((bbox.xmax * w_ratio) as i64).clamp(0, self.w);
let ymax = ((bbox.ymax * h_ratio) as i64).clamp(0, self.h);
self.draw_line(image, xmin, xmax, ymin, ymax.min(ymin + 2));
self.draw_line(image, xmin, xmax, ymin.max(ymax - 2), ymax);
self.draw_line(image, xmin, xmax.min(xmin + 2), ymin, ymax);
self.draw_line(image, xmin.max(xmax - 2), xmax, ymin, ymax);
}
tch::vision::image::save(&image, "./result.jpg").unwrap();
}
但是这样我们仅仅只能绘制出矩形检测框,我如果还想绘制出类别也就是在图上绘制文字,就需要引入别的依赖
image="0.24.6"
rusttype="0.9.3"
imageproc="0.23.0"
然后读取保存的结果图片进行二次加工绘制
fn text(bboxes: Vec<Bbox>) {
    let mut image = open("./result.jpg").unwrap().into_rgb8();
    let font = Vec::from(include_bytes!("./DejaVuSans.ttf") as &[u8]);
    let font = Font::try_from_vec(font).unwrap();
    let size = 20.;
    let scale = Scale {
        x: size * 1.5,
        y: size * 2.,
    };
    let w_ratio = image.width() as f64 / 640 as f64;
    let h_ratio = image.height() as f64 / 640 as f64;
    for bbox in bboxes.iter() {
        println!(
            "xmin={},ymin={},xmax={},ymax={},class_label={},confidence={}",
            bbox.xmin,
            bbox.ymin,
            bbox.xmax,
            bbox.ymax,
            coco_names::COCO_NAMES[bbox.cls as usize],
            bbox.confidence
        );
        let text = coco_names::COCO_NAMES[bbox.cls as usize];
        draw_text_mut(
            &mut image,
            Rgb([255u8, 0u8, 0u8]),
            (bbox.xmin * w_ratio) as i32 + 10,
            (bbox.ymin * h_ratio) as i32 + 10,
            scale,
            &font,
            text,
        );
        let _ = image.save("./result.jpg").unwrap();
    }
}
几乎同样的操作重复两次实属无奈,在tch中貌似没有找到相关的api实现在Tensor上绘制文字信息.
经过上面的努力,运行看看效果
cargo run main yolov8s.torchscript bus.jpg
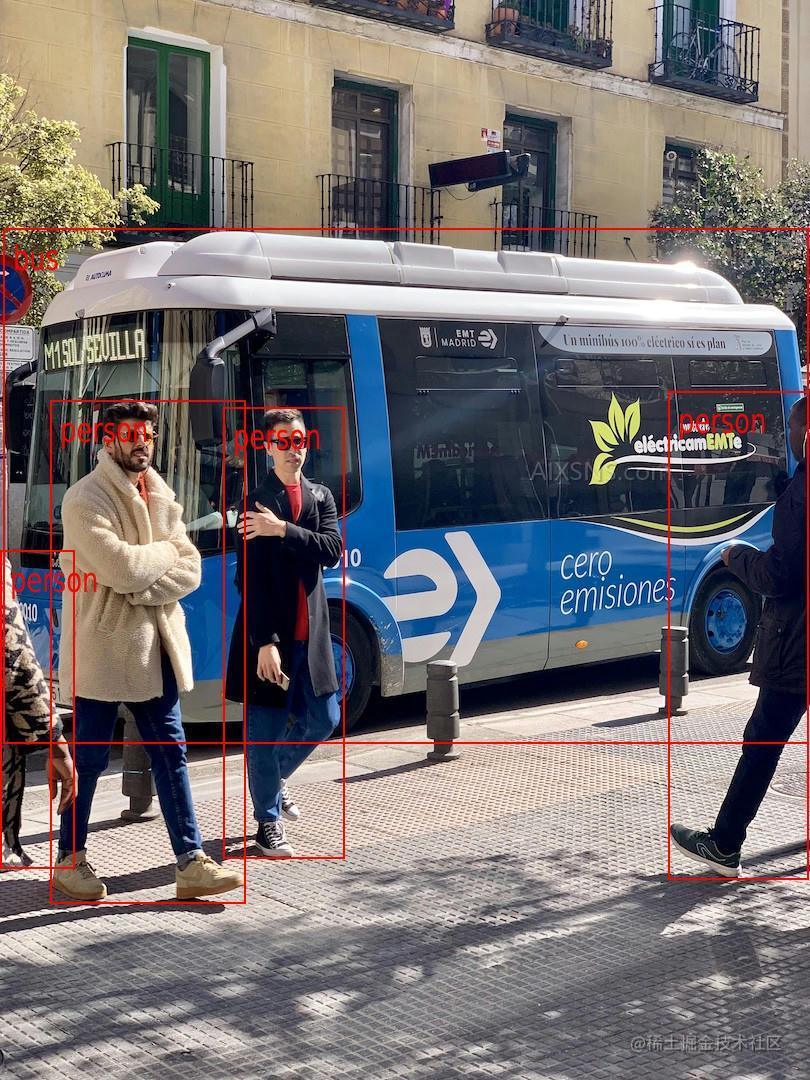
总结
我通过tch用Rust实现了对Yolov8的推理,并且最终输出结果与实际推理结果一致,很好的做到了精度对齐.不过这里面还是存在一点点小问题的,模型推理讲究的是推理时间与实时性要求,来看看在不同device下我推理时间的结果.


在cpu比较正常的0.17s左右,而在GPU上推理居然花费了1s左右.这个完全不能理解,即是是一张图片而不是batch作为推理,按道理GPU和CPU推理速度的差异也不应该这么大.即使是由于数据upload到GPU中造成一些耗时,但是我明明在传入之前就已经保证数据在device中了,可推理耗时依旧在1s左右.详情可以参考官网的issue.目前我的猜想是某些机制导致数据的重复拷贝上传到device,不过还需要进一步验证.
