前言
直接看效果,狗头:
之所以搞这个的话,当然主要一方面是因为确实有点意思在里面,此外在很久以前,也有很多的UP做过这样的玩意。当然更重要的是,这玩意在某宝上面竟然敢卖1.6K,这谁受得了。于是花了点时间把这个玩意给做出来了。
这里我测试的游戏是:《荒野行动》,你换啥游戏其实都可以,没啥影响,之后后面把模型换一下即可。
前置知识的话,主要是用到我前几篇博文关于Yolo的一些使用,包括自己训练数据集,其他的其实没啥了。
那么在这里的话,我们先主要完成一些基本的准备工作,例如窗口的绘制,鼠标的移动,和我们系统的GUI界面设计。
系统窗体设计
那么废话不多说,我们先来设计好我们的窗口。
这个窗口的话,我们就直接拿到tkiner进行编写了。
提示弹窗
这个的话,比较简单,在GUI部分,一个是我们的提示弹窗,还有一个就是窗口主题的设计。之后的话就是逻辑和功能,这部分,还没有整合完毕,就先不写了,先把窗口写好。
    import tkinter as tk
    from tkinter import ttk


    class ToolTip:
        def __init__(self, widget, text):
            self.widget = widget
            self.tooltip = None
            self.text = text
            self.widget.bind("<Enter>", self.show_tooltip)
            self.widget.bind("<Leave>", self.hide_tooltip)

        def show_tooltip(self, event=None):
            x, y, _, _ = self.widget.bbox("insert")
            x += self.widget.winfo_rootx() + 25
            y += self.widget.winfo_rooty() + 25

            self.tooltip = tk.Toplevel(self.widget)
            self.tooltip.wm_overrideredirect(True)
            self.tooltip.wm_geometry(f"+{x}+{y}")
            label = ttk.Label(self.tooltip, text=self.text, background="#00BFFF", relief="solid", borderwidth=1)
            label.pack()

        def hide_tooltip(self, event=None):
            if self.tooltip:
                self.tooltip.destroy()
                self.tooltip = None
功能主体页面
之后的话就是我们的主体页面了。
这个代码也比较简单,就是几个复选框,几个按钮。
class Application(tk.Tk):
def __init__(self):
super().__init__()
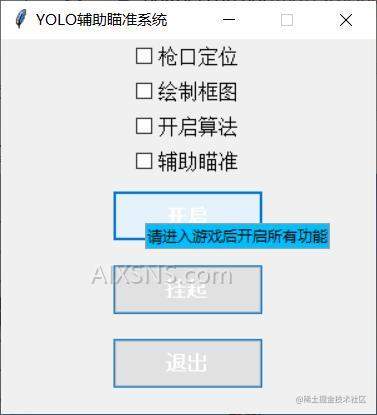
self.title("YOLO辅助瞄准系统")
self.geometry("300x300") # 设置固定的窗口大小
self.resizable(False, False) # 禁止调整窗口大小
self.style = ttk.Style(self)
self.style.configure("TButton",
padding=6,
relief="flat",
background="#0078d7",
foreground="white",
font=("Arial", 12, "bold"))
self.style.configure("TCheckbutton",
padding=4,
font=("Arial", 12))
self.create_widgets()
def create_widgets(self):
self.location_assist_var = tk.IntVar()
self.location_assist_checkbox = ttk.Checkbutton(self,
text="枪口定位",
variable=self.location_assist_var
)
self.location_assist_checkbox.pack()
ToolTip(self.location_assist_checkbox, "开启后按住鼠标左键,定位枪口位置,按F4关闭,"
"如果需要控制其他软件,请先关闭!!!")
self.draw_box_var = tk.IntVar()
self.draw_box_checkbox = ttk.Checkbutton(self, text="绘制框图",
variable=self.draw_box_var
)
self.draw_box_checkbox.pack()
ToolTip(self.draw_box_checkbox, "绘制算法识别到的目标")
self.algorithm_detection_var = tk.IntVar()
self.algorithm_detection_checkbox = ttk.Checkbutton(self, text="开启算法",
variable=self.algorithm_detection_var)
self.algorithm_detection_checkbox.pack()
ToolTip(self.algorithm_detection_checkbox, "开启Yolo算法进行识别")
self.aim_assist_var = tk.IntVar()
self.aim_assist_checkbox = ttk.Checkbutton(self, text="辅助瞄准",
variable=self.aim_assist_var)
self.aim_assist_checkbox.pack()
ToolTip(self.aim_assist_checkbox, "基于算法进行定位,实时定位目标")
self.start_button = ttk.Button(self, text="开启", command=self.start_program)
self.start_button.pack(pady=10)
ToolTip(self.start_button, "请进入游戏后开启所有功能")
self.pause_button = ttk.Button(self, text="挂起", command=self.pause_program)
self.pause_button.pack(pady=10)
ToolTip(self.pause_button, "为避免按键冲突,在离开游戏后,点击挂起,注意,请先关闭枪口定位")
self.quit_button = ttk.Button(self, text="退出", command=self.quit_program)
self.quit_button.pack(pady=10)
def start_program(self):
print("程序开始")
def pause_program(self):
print("程序挂起")
def quit_program(self):
self.destroy()
if __name__ == "__main__":
app = Application()
app.mainloop()
windows窗体绘制
之后的话,就来到了我们第二个部分,就是在我们的Windows窗口当中去绘制图形。准确地来说,是直接在屏幕上面绘制图像。那么我们这边主要是绘制矩形。
矩形绘制
在这里的话,由于比较底层,所以的话,我这边采用的是win32。没办法,只能这样处理。并且通过实际测试,和相关资料的查找,发现以这种直接绘点的形式来绘制矩形的效率是最高的。
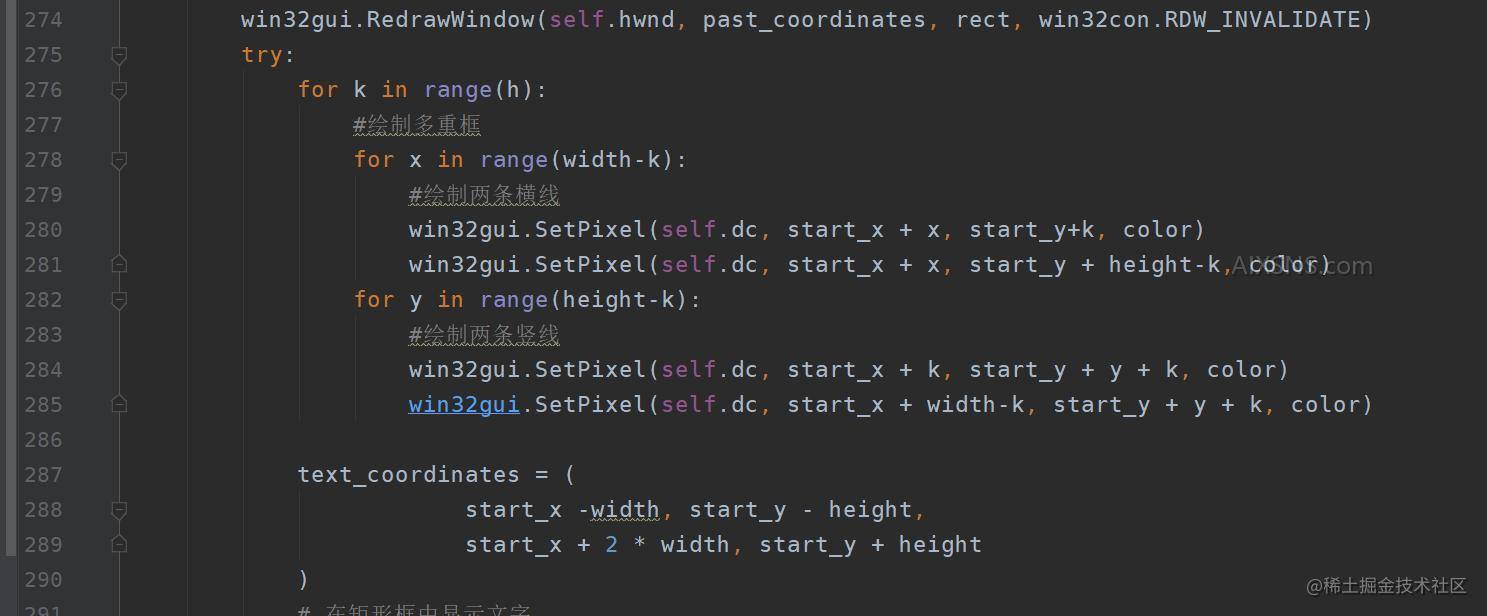
所以,我这边主要就是对这个进行封装。
自定义线程池
由于,在后面我们是几个模块同时运行的,所以为了方便处理我这里还自定义了一个线程池,这样的话方便管理线程。同时提高安全性,此外的话,在这边,我要将绘制和算法识别分开。算法识别的话,主要流程是屏幕截图,然后送到算法进行识别,得到bbox,然后交给到这里进行绘制。但是的话,算法比较耗费资源,并且说实话,变化不大,也就是说,1s,我其实只需要识别20fps甚至是10fps其实就可以了。但是矩形绘制的话,我们还是尽可能和游戏帧数保持一致或者更高,所以由于这里存在差速,那么只能开线程并发处理了。
class ThreadPoolManager:
    def __init__(self, max_workers=5, idle_timeout=60):
        self.max_workers = max_workers
        self.idle_timeout = idle_timeout
        self.executor = concurrent.futures.ThreadPoolExecutor(max_workers=self.max_workers)
        self.worker_count = 0

    def execute(self, task, *args, **kwargs):
        # 提交任务给线程池
        future = self.executor.submit(task, *args, **kwargs)

        # 更新工作线程数量
        with concurrent.futures.ThreadPoolExecutor() as temp_executor:
            self.worker_count = temp_executor._adjust_thread_count()

        return future

    def get_result(self, future):
        return future.result()

    def shutdown(self):
        # 关闭线程池
        self.executor.shutdown()

    def _adjust_thread_count(self):
        # 自动调整线程数量
        if self.worker_count < self.max_workers and self.executor._idle_semaphore.acquire(timeout=0):
            # 创建新的工作线程
            self.worker_count += 1
            return True
        elif self.worker_count > 1 and self.executor._idle_semaphore.release():
            # 销毁多余的空闲线程
            self.worker_count -= 1
            return True
        else:
            return False
完整代码
之后,我们来看到完整的代码:
class ScreenUtils():

    @staticmethod
    def get_real_resolution():
        """获取真实的分辨率"""
        hDC = win32gui.GetDC(0)
        # 横向分辨率
        w = win32print.GetDeviceCaps(hDC, win32con.DESKTOPHORZRES)
        # 纵向分辨率
        h = win32print.GetDeviceCaps(hDC, win32con.DESKTOPVERTRES)
        return w, h

    @staticmethod
    def get_screen_size():
        """获取缩放后的分辨率"""
        w = GetSystemMetrics (0)
        h = GetSystemMetrics (1)
        return w, h

    @staticmethod
    def scale_rate():

        real_resolution = ScreenUtils.get_real_resolution()
        screen_size = ScreenUtils.get_screen_size()
        screen_scale_rate = round(real_resolution[0] / screen_size[0], 2)
        return screen_scale_rate


class RectangleDrawer:

    def __init__(self,size=100,pool_size=6):


        self.draw_helper_pool = ThreadPoolManager(max_workers=pool_size)
        self.size = size
        self.screen_scale_rate = ScreenUtils.scale_rate()
        self.dc = win32gui.GetDC(0)
        self.dcObj = win32ui.CreateDCFromHandle(self.dc)
        self.hwnd = win32gui.WindowFromPoint((0, 0))
        self.monitor = (0, 0, GetSystemMetrics(0), GetSystemMetrics(1))
        self.red = win32api.RGB(255, 0, 0) # Red
        self.drawing = False
        # rgbs = np.random.rand(32, 3) * 255
        rgbs = [(255,0,0),(255,255,0),(0,0,204),(0,255,0)]
        self.screen_width = win32api.GetSystemMetrics(0)
        self.screen_height = win32api.GetSystemMetrics(1)
        self.colours = [win32api.RGB(int(c[0]), int(c[1]), int(c[2])) for c in rgbs]

        self.going_draw = True
        self.items = []


    def drawRectanglesBySelf(self,fps=60):

        def go():
            t = 1/fps
            while(self.going_draw):
                time.sleep(t)
                self.drawRectangles()
        self.draw_helper_pool.execute(go)

    def setItems(self,items):
        self.items = items
    def drawRectangles(self):
        """
        绘制多个目标框
        :param items:
        :return:
        """
        for item in self.items:
            text = item['cls']+":"+"conf:"+"{:.2f}".format(item['conf'])
            left,top,width,height = item['box']
            color = self.colours[int(item['id']%len(self.colours))]
            # 进行坐标边界检查
            left = max(0, min(left, self.screen_width - 1))
            top = max(0, min(top, self.screen_height - 1))
            right = max(0, min(left + width, self.screen_width - 1))
            bottom = max(0, min(top + height, self.screen_height - 1))
            # 绘制矩形框
            self.new_items = True
            if(item['cls']=='person'):
                # self.draw_helper_pool.execute(self.drawSingle,text, left, top, right - left, bottom - top, color)
                self.drawSingle(text, left, top, right - left, bottom - top, color)

    def drawSingle(self,text,left,top,width,height,color,h=5):

        start_x = int(left)
        start_y = int(top)
        # past_coordinates = self.monitor
        past_coordinates = (start_x - 2 * width, start_y - 2 * height,
                            start_x + 2 * width, start_y + 2 * height
                            )
        rect = win32gui.CreateRoundRectRgn(*past_coordinates, 2, 2)
        win32gui.RedrawWindow(self.hwnd, past_coordinates, rect, win32con.RDW_INVALIDATE)
        try:
            for k in range(h):
                #绘制多重框
                for x in range(width-k):
                    #绘制两条横线
                    win32gui.SetPixel(self.dc, start_x + x, start_y+k, color)
                    win32gui.SetPixel(self.dc, start_x + x, start_y + height-k, color)
                for y in range(height-k):
                    #绘制两条竖线
                    win32gui.SetPixel(self.dc, start_x + k, start_y + y + k, color)
                    win32gui.SetPixel(self.dc, start_x + width-k, start_y + y + k, color)

            text_coordinates = (
                        start_x -width, start_y - height,
                        start_x + 2 * width, start_y + height
            )
            # 在矩形框中显示文字
            win32gui.DrawText(self.dc, text, -1, text_coordinates,
                              win32con.DT_CENTER | win32con.DT_VCENTER | win32con.DT_SINGLELINE)
        except Exception as e:
            pass


    def draw(self,text="你好"):
        past_coordinates = self.monitor
        while(self.drawing):
            m = win32gui.GetCursorPos()
            rect = win32gui.CreateRoundRectRgn(*past_coordinates, 2, 2)
            win32gui.RedrawWindow(self.hwnd, past_coordinates, rect, win32con.RDW_INVALIDATE)
            start_x = int(m[0]*self.screen_scale_rate)
            start_y = int(m[1]*self.screen_scale_rate)
            for x in range(self.size):
                win32gui.SetPixel(self.dc, start_x + x, start_y, self.red)
                win32gui.SetPixel(self.dc, start_x + x, start_y + self.size, self.red)
                win32gui.SetPixel(self.dc, start_x, start_y + x, self.red)
                win32gui.SetPixel(self.dc, start_x + self.size, start_y + x, self.red)
                past_coordinates = (start_x - 2*self.size, start_y - 2*self.size, start_x + 2*self.size, start_y + 2*self.size)

            text_coordinates = (
            start_x -self.size, start_y - self.size, start_x + 2 * self.size, start_y + self.size)
            # 在矩形框中显示文字
            win32gui.DrawText(self.dc, text, -1, text_coordinates,
                              win32con.DT_CENTER | win32con.DT_VCENTER | win32con.DT_SINGLELINE)
当然这里面还有一些细节,但是的话,代码都有说明,就不多说了。
总结
当然,我们做这个的目的还是为了学习和交流,如何用Python 的win32做一些比较好玩的东西。同时等开发完毕,代码也将进行开源处理。
