本文正在参加github.com/protocolbuf… 用迅雷下载对应操作系统的压缩包,我的是 win7 版本: github.com/protocolbuf…
(2)下载好之后随便解压到自定义目录,我的是 “主目录protoc-22.1-win64”,然后将其中的 “主目录protoc-22.1-win64bin” 路径添加到用户环境变量中的 PATH 变量中,重新打开命令行,输入 protoc –version ,如果能正常返回版本号说明配置成功,可以开始使用。
(3)进入命令行,在和本文件同一个目录下,执行命令
git clone --depth 1 https://github.com/tensorflow/models
,将 models 文件夹下载下来,进入 models/research/ 下,使用命令执行
protoc object_detection/protos/*.proto --python_out=.
将 models/research/object_detection/packages/tf2/setup.py 拷贝到和 models/research/ 下,然后使用执行本文件的 python 对应的 pip 去执行安装包操作
..Anaconda3envstfcpu2.10_py38Scriptspip.exe install . -i https://pypi.tuna.tsinghua.edu.cn/simple
中间可能会报错“error: netadata-generation-failed”,一般都是某个包安装的时候出问题了,我们只需要看详细的日志,单独用 pip 进行安装即可,单独安装完之后,再去执行上面的根据 setup.py 的整装操作,反复即可,过程有点麻烦但还是都可以安装成功的。
(4)这里的模型本来在:
https://tfhub.dev/tensorflow/centernet/hourglass_512x512_kpts/1
但是由于网络问题无法获取,所以我们可以改为从
https://storage.googleapis.com/tfhub-modules/tensorflow/centernet/hourglass_512x512_kpts/1.tar.gz
获取模型。
from object_detection.utils import label_map_util
from object_detection.utils import visualization_utils as viz_utils
from object_detection.utils import ops as utils_ops


PATH_TO_LABELS = './models/research/object_detection/data/mscoco_label_map.pbtxt'
category_index = label_map_util.create_category_index_from_labelmap(PATH_TO_LABELS, use_display_name=True)

model_path = 'https://storage.googleapis.com/tfhub-modules/tensorflow/centernet/hourglass_512x512_kpts/1.tar.gz'
print('TensorFlow Hub 中的模型地址: {}'.format(model_path))
print('加载模型...')
hub_model = hub.load(model_path)
print('加载成功!')
打印结果:
TensorFlow Hub 中的模型地址: https://storage.googleapis.com/tfhub-modules/tensorflow/centernet/hourglass_512x512_kpts/1.tar.gz
加载模型...
WARNING:absl:Importing a function (__inference_batchnorm_layer_call_and_return_conditional_losses_42408) with ops with custom gradients. Will likely fail if a gradient is requested.
WARNING:absl:Importing a function (__inference_batchnorm_layer_call_and_return_conditional_losses_209416) with ops with custom gradients. Will likely fail if a gradient is requested.
...
WARNING:absl:Importing a function (__inference_batchnorm_layer_call_and_return_conditional_losses_56488) with ops with custom gradients. Will likely fail if a gradient is requested.
加载成功!
(5)在这里我们主要定义了一个函数 load_image_into_numpy_array 来加载从网上下载图片的图片,并将其转换为模型可以适配的输入类型。
(6)IMAGES_FOR_TEST 字典中记录了多个可以用来测试的图片,但是这些都是在网上,用的使用需要调用 load_image_into_numpy_array 函数。
(7)COCO17_HUMAN_POSE_KEYPOINTS 记录了人体姿态关键点。
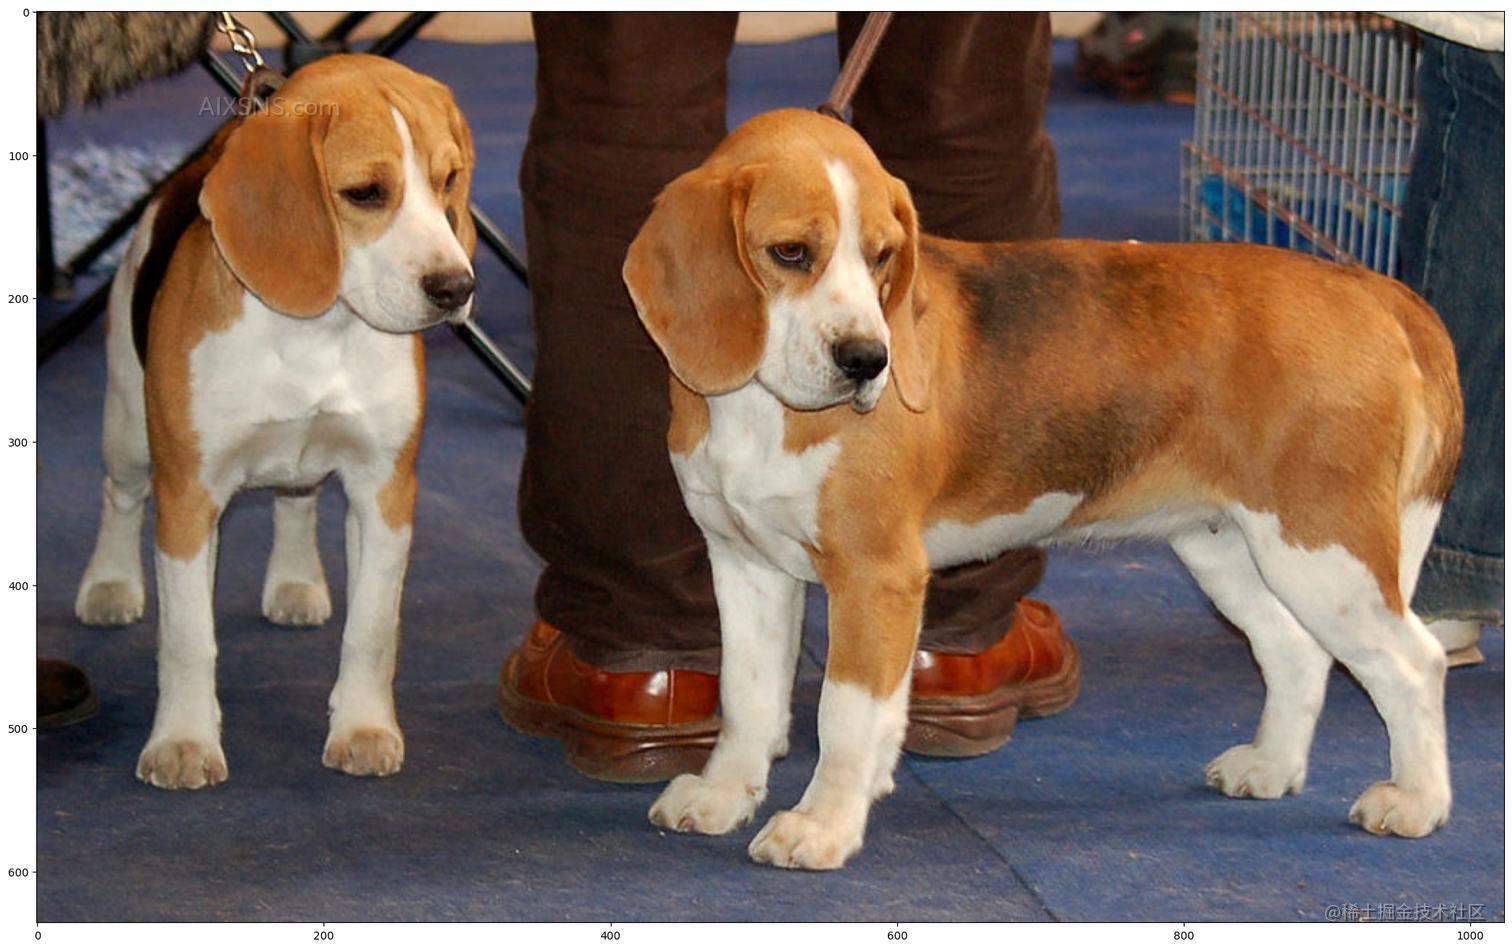
(8)我们这里展示了 dogs 这张图片,可以看到两条可爱的小狗。
def load_image_into_numpy_array(path):
    image = None
    if(path.startswith('http')):
        response = urlopen(path)
        image_data = response.read()
        image_data = BytesIO(image_data)
        image = Image.open(image_data)
    else:
        image_data = tf.io.gfile.GFile(path, 'rb').read()
        image = Image.open(BytesIO(image_data))

    (im_width, im_height) = image.size
    return np.array(image.getdata()).reshape((1, im_height, im_width, 3)).astype(np.uint8)


IMAGES_FOR_TEST = {
  'Beach' : 'models/research/object_detection/test_images/image2.jpg',
  'Dogs' : 'models/research/object_detection/test_images/image1.jpg',
  'Naxos Taverna' : 'https://upload.wikimedia.org/wikipedia/commons/6/60/Naxos_Taverna.jpg',
  'Beatles' : 'https://upload.wikimedia.org/wikipedia/commons/1/1b/The_Coleoptera_of_the_British_islands_%28Plate_125%29_%288592917784%29.jpg',
  'Phones' : 'https://upload.wikimedia.org/wikipedia/commons/thumb/0/0d/Biblioteca_Maim%C3%B3nides%2C_Campus_Universitario_de_Rabanales_007.jpg/1024px-Biblioteca_Maim%C3%B3nides%2C_Campus_Universitario_de_Rabanales_007.jpg',
  'Birds' : 'https://upload.wikimedia.org/wikipedia/commons/0/09/The_smaller_British_birds_%288053836633%29.jpg',
}

COCO17_HUMAN_POSE_KEYPOINTS = [(0, 1), (0, 2),(1, 3),(2, 4),(0, 5),(0, 6),(5, 7),(7, 9),(6, 8),(8, 10),(5, 6),(5, 11), (6, 12),(11, 12),(11, 13),(13, 15),(12, 14),(14, 16)]

%matplotlib inline
selected_image = 'Dogs'
image_path = IMAGES_FOR_TEST[selected_image]
image_np = load_image_into_numpy_array(image_path)
plt.figure(figsize=(24,32))
plt.imshow(image_np[0])
plt.show()
目标检测
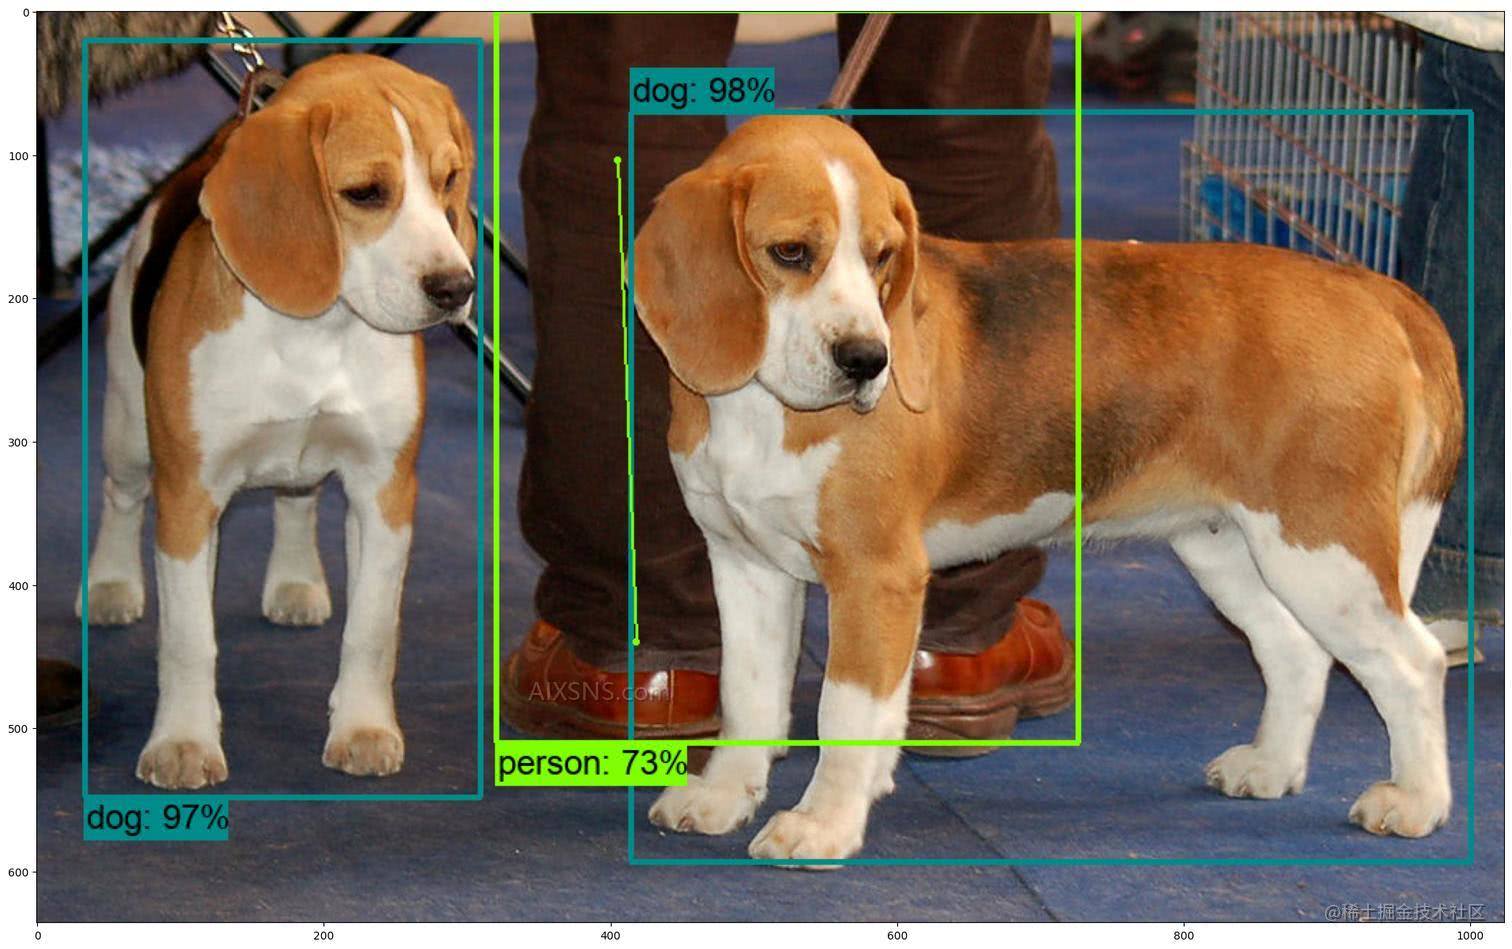
我们这里将经过处理的小狗的图片传入模型中,会返回结果,我们只要使用结果来绘制出所检测目标的框,以及对应的类别,分数,可以看出来结果是相当的准确的,甚至通过人的腿就能识别出人的框。
results = hub_model(image_np)
result = {key:value.numpy() for key,value in results.items()}
label_id_offset = 0
image_np_with_detections = image_np.copy()

keypoints, keypoint_scores = None, None
if 'detection_keypoints' in result:
    keypoints = result['detection_keypoints'][0]
    keypoint_scores = result['detection_keypoint_scores'][0]

viz_utils.visualize_boxes_and_labels_on_image_array(
      image_np_with_detections[0],
      result['detection_boxes'][0],
      (result['detection_classes'][0] + label_id_offset).astype(int),
      result['detection_scores'][0],
      category_index,
      use_normalized_coordinates=True,
      max_boxes_to_draw=200,
      min_score_thresh=.30,
      agnostic_mode=False,
      keypoints=keypoints,
      keypoint_scores=keypoint_scores,
      keypoint_edges=COCO17_HUMAN_POSE_KEYPOINTS)

plt.figure(figsize=(24,32))
plt.imshow(image_np_with_detections[0])
plt.show()